Difference between revisions of "iRefScape 0.6"
PaulBoddie (talk | contribs) (→Using Cytoscape plugin manager: Added uninstall notes.) |
PaulBoddie (talk | contribs) m (moved README Cytoscape plugin 0.6x to iRefScape 0.6: Simplify the page names.) |
||
| (14 intermediate revisions by 3 users not shown) | |||
| Line 1: | Line 1: | ||
| − | |||
| − | |||
<pre> | <pre> | ||
Date : December 03rd, 2009 | Date : December 03rd, 2009 | ||
| Line 22: | Line 20: | ||
* Check whether the plugin is already installed (A menu entry iRefIndex_xx under plugin menu of Cytoscape). If you want to reinstall, please uninstall previous versions. if the intention is to get the latest version use "Update plugins" from plugin menu | * Check whether the plugin is already installed (A menu entry iRefIndex_xx under plugin menu of Cytoscape). If you want to reinstall, please uninstall previous versions. if the intention is to get the latest version use "Update plugins" from plugin menu | ||
| − | === Using Cytoscape plugin manager === | + | === Using Cytoscape plugin manager === |
| + | |||
| + | [[Image:IRefIndex-Cytoscape-Manage-Plugins.png|thumb|300px|Manage Plugins]] | ||
| + | |||
# Start Cytoscape. You must start Cytoscape as a user that has write privileges to the target directory. | # Start Cytoscape. You must start Cytoscape as a user that has write privileges to the target directory. | ||
# From the menu select "Plugins" -> "Manage Plugins". | # From the menu select "Plugins" -> "Manage Plugins". | ||
| Line 33: | Line 34: | ||
To make the plugin available: | To make the plugin available: | ||
| + | |||
| + | [[Image:IRefIndex-Cytoscape-Plugin-Download-Sites.png|thumb|300px|Plugin Download Sites]] | ||
# Click on "Change Download Site" button (in the top-right-hand corner of the window). | # Click on "Change Download Site" button (in the top-right-hand corner of the window). | ||
| Line 40: | Line 43: | ||
#* URL: <tt>ftp://ftp.no.embnet.org/irefindex/Cytoscape/plugin/current/plugins_irefindex.xml</tt> | #* URL: <tt>ftp://ftp.no.embnet.org/irefindex/Cytoscape/plugin/current/plugins_irefindex.xml</tt> | ||
# Click "OK" to close each of the dialogues until the "Manage Plugins" dialogue is visible. | # Click "OK" to close each of the dialogues until the "Manage Plugins" dialogue is visible. | ||
| + | |||
| + | [[Image:IRefIndex-Cytoscape-Bookmark-manager.png|thumb|300px|Bookmark manager]] | ||
To install the plugin: | To install the plugin: | ||
| Line 59: | Line 64: | ||
=== Completing the installation === | === Completing the installation === | ||
| + | |||
| + | [[Image:IRefIndex-Cytoscape-Location.png|thumb|300px|Indicating the location of iRefIndex data]] | ||
| + | |||
| + | [[Image:IRefIndex-Cytoscape-Download.png|thumb|300px|The download status dialogue]] | ||
| + | |||
| + | [[Image:IRefIndex-Cytoscape-Success.png|thumb|300px|A successful installation]] | ||
| + | |||
#We recommend that you restart Cytoscape after installing the plugin or updating it. | #We recommend that you restart Cytoscape after installing the plugin or updating it. | ||
#First time you activate the plugin (In the main Cytoscape window, select "Plugins" -> "iRefIndex_0.6x"), you will be prompted to select an installation directory for the data and indices. The recommended place would be the plugin home directory which would appear as the recommended (default). The data and indices require a minimum disk space of 1 Gb at this location. We encourage the users to use this default directory. | #First time you activate the plugin (In the main Cytoscape window, select "Plugins" -> "iRefIndex_0.6x"), you will be prompted to select an installation directory for the data and indices. The recommended place would be the plugin home directory which would appear as the recommended (default). The data and indices require a minimum disk space of 1 Gb at this location. We encourage the users to use this default directory. | ||
| − | #If the default directory is selected and it is not accessible the user would be prompted to restart Cytoscape. If this | + | #If the default directory is selected and it is not accessible the user would be prompted to restart Cytoscape. If this message appears on second or subsequent attempts, this would mean there might be a problem accessing this directory and please make sure that you have write access and a minimum available free space of 1Gb. |
| − | #The downloading and installation of indices usually takes less than 5 minutes if you have a internet connection of 10Mb/sec or more. However we have experienced delays up to 15 to 30 minutes when the installation was done using wireless network with below average signal strength. If you are planing to use the plugin in | + | #The downloading and installation of indices usually takes less than 5 minutes if you have a internet connection of 10Mb/sec or more. However we have experienced delays up to 15 to 30 minutes when the installation was done using wireless network with below average signal strength. If you are planing to use the plugin in a laboratory demonstration where more than 15 people would try to perform the installation simultaneously, we recommend that everyone is not using the same wireless resource and do this in subgroups (e.g. 5 at a time). If we are informed of demonstrations we could give you advice on how to perform the installation smoothly. |
#The installation process should now complete itself. | #The installation process should now complete itself. | ||
| − | #If the installation was successful, you will see a list of indices in the Results text box in green text and if the installation fails you will see errors in red text. (If you cannot see the iRefIndex panel, click on the title "iRefIndex", near the "Network" tab of Cytoscape). | + | #If the installation was successful, you will see a list of indices in the Results text box in green text and if the installation fails you will see errors in red text. (If you cannot see the iRefIndex panel, click on the title "iRefIndex", near the "Network" tab of Cytoscape.) |
| + | |||
| + | |||
| + | <br clear="all" /> | ||
| + | === Details of iRefindex plugin installation === | ||
| + | #The plugin has two componants. | ||
| + | *The java executable file (JAR) which is the software component dealing with all the functionalities. | ||
| + | *Data component containing protein-protein interaction data. | ||
| + | |||
| + | both these components are required for the functioning of the plugin. The installation section above explains how to install the JAR and once the JAR is installed and the plugin is loaded the data component will be downloaded by it. The downloaded file is a compressed one and has the extension .irfz and a size around 200 MB. After the download is complete this file will be partially uncompressed (The indices and few other files required for the immediate operation will be extracted from the complex file). However, the bulk of the data will remain compressed and will be uncompressed when needed. Thus, the speed of query execution will increase with usage and the size of the iRefIndex folder will increase. Therefore, although available free space of 250Mb is enough during installation, the plugin requires available free space of 1Gb for its operation. | ||
| + | |||
| + | If the plugin manager is used for the instalation,(as of Cytoscape 2.6.3) the plugin will be placed in a directory under the home area and a record is file kept in a file named 'track_plugins.xml'. The location of these would as follows. | ||
| + | *Linux : ~/.cytoscape/2.6 | ||
| + | *Windows: | ||
| + | |||
| + | The entry corresponding to iRefIndex plugin would looks like follows: | ||
| + | |||
| + | <plugin> | ||
| + | <uniqueID /> | ||
| + | <name>iRefIndex</name> | ||
| + | <description>.<br>http://irefindex.uio.no/wiki/README_Cytoscape_plugin_0.6x<p></description> | ||
| + | <cytoscapeVersion>2.6</cytoscapeVersion> | ||
| + | <url /> | ||
| + | <downloadUrl /> | ||
| + | <category>Network and Attribute I/O</category> | ||
| + | <releaseDate>JANUARY 15, 2009</releaseDate> | ||
| + | <pluginVersion>0.63</pluginVersion> | ||
| + | <classname>cytoscape.no.uio.biotek.Main</classname> | ||
| + | <projectUrl>http://irefindex.uio.no</projectUrl> | ||
| + | <filetype>jar</filetype> | ||
| + | <installLocation>/............/Cytoscape_2_6_3/plugins/iRefIndex_beta6.jar</installLocation> | ||
| + | <license> | ||
| + | <text /> | ||
| + | </license> | ||
| + | <authorlist> | ||
| + | <author> | ||
| + | <name>Ian Donaldson and Sabry Razick</name> | ||
| + | <institution>Biotechnology Centre of Oslo, University of Oslo</institution> | ||
| + | </author> | ||
| + | </authorlist> | ||
| + | <filelist> | ||
| + | <file>/........../Cytoscape_2_6_3/plugins/iRefIndex_beta6.jar</file> | ||
| + | </filelist> | ||
| + | </plugin> | ||
| + | |||
| + | *TIP!. If you do encounter an exception during start up of Cytoscape due to a plugin and there is no way of uninstalling it, you could remove the entry for the corresponding plugin from this file when Cytoscape is not running (Take a backup of the file, then delete everything from <plugin> to </plugin> for the troubling plugin, save the file and then start Cytoscape) | ||
| + | |||
| + | The downloading and installation of the plugin JAR is manged by Cytoscape core and if the plugin complies with the requirements the instalation should be smooth. However, some of our users do encounter problems when instating the data component. This is mainly due to privileged and security issues. | ||
| + | *Privileged issue is whether the user has access to the place where he intends to download the data component (The directory should have write access) | ||
| + | *Security issues are mainly encountered in Microsoft Windows based systems. When a software try to perform a suspicious operation the operation is blocked and the user is prompted confirm that this is something he knows. The the user select block in such a warning window during the installation of iRefIndex plugin, the installation fails may not be possible to install again until the block is removed manually. We have tested with several popular virus guards but have not encountered any issues relating to them yet, if you encounter any issue please report to us. | ||
| + | |||
| + | The behavior of the plugin when installed using plugin manager is different before and ofter Cytoscape is restarted. After the installation the plugin will appear in the plugin manager and could be activated, however it is not aware of its surrounding. i.e it doesn't know its installation location. Therefore it is highly recommended that the user restart Cytoscape immediately after installing the plugin and avoid activating the plugin before the first restart (do not click on the menu entry iRefIndex). When a manual installation was performed the plugin could be activated for the first start up of Cytoscape as Cytoscape is not running while the installation. | ||
| + | After the first restart of Cytoscape after installing the plugin when the plugin is activated it tries to download the data component. For this the plugin requests a location to place the data and it suggests a default location under the home area (or plugin folder for manual installation), we recommend using this default location unless there is a absolute requirement to do otherwise. | ||
| + | |||
| + | some of the reasons behind distributing the data with the plugin rather than more popular approach like web services is as follows; | ||
| + | *Execution speed | ||
| + | *No need for a fast internet connection after installation | ||
| + | *Our server-side limits | ||
| + | *Privacy for the user (There is no monitoring of the types of searches the end user performs, this remains private unless the user decides to share it) | ||
| + | |||
| + | |||
| + | <br clear="all" /> | ||
== Notes on platform-specific issues == | == Notes on platform-specific issues == | ||
| Line 70: | Line 143: | ||
=== Windows Vista and Windows XP === | === Windows Vista and Windows XP === | ||
| − | You will require write privileges to the installation directory not only during installation but also during operation. If the plugin disappears from the plugin menu or it does not appear at all, then Cytoscape has to be started as | + | You will require write privileges to the installation directory not only during installation but also during operation. If the plugin disappears from the plugin menu or it does not appear at all, then Cytoscape has to be started as an administrator. This could be done by right-clicking on Cytoscape shortcut and selecting "Run as" option. When requesting help for such situations please include a copy-paste of the Cytoscape error console ("Help" -> "Error console"). (To copy-paste, open the error console, click inside, press <tt>Ctrl-A</tt> (to select all) then <tt>Ctrl-C</tt> (to copy). The selection can then be pasted into a message using <tt>Ctrl-V</tt>.) |
| − | ( | ||
=== Mac OS X === | === Mac OS X === | ||
| − | The plugin will not work unless Java 1.5 or later is installed. | + | * Please verify that Java 1.5 or later is available. ''The plugin will not work unless Java 1.5 or later is installed.'' |
| − | + | * Increase the <tt>Xmx</tt> setting to <tt>512m</tt> and the <tt>Xms</tt> setting to <tt>512m</tt> in <tt>cytoscape.sh</tt>. | |
| − | + | * This version of the plugin is not extensively tested on Mac OS and we are sorry that the support we could provide for Mac users is limited at this point. | |
=== Unix/Linux === | === Unix/Linux === | ||
| − | + | ||
| − | + | * Please verify that Java 1.5 or later is available. | |
| − | + | ** The "Java SE Development Kit (JDK)" from http://java.sun.com/javase/downloads/index.jsp is suitable. | |
| − | + | ** The OpenJDK packages from http://openjdk.java.net/install/ may also be suitable and are often available via distributions. For example, OpenJDK 6 for [http://packages.debian.org/search?keywords=openjdk-6-jdk&searchon=names&suite=all§ion=all Debian] and [http://packages.ubuntu.com/search?keywords=openjdk-6-jdk&searchon=names&suite=all§ion=all Ubuntu]. | |
| − | + | * You will require write privileges to the installation directory not only during installation but also during operation. | |
| + | * The plugin behavior is proven to be very stable in Unix/Linux environments. | ||
| + | * To improve font appearance, try adding the following environment variable definition to your configuration (in <tt>.bashrc</tt> or <tt>.bash_profile</tt>), as described in this [http://wiki.archlinux.org/index.php/Java_Fonts_-_Sun_JRE guide to Java fonts for Arch Linux]: | ||
| + | |||
| + | export _JAVA_OPTIONS='-Dawt.useSystemAAFontSettings=lcd' | ||
=== Other === | === Other === | ||
| Line 93: | Line 169: | ||
Please report us if you encounter any new bug | Please report us if you encounter any new bug | ||
| − | ==Usage== | + | == Usage == |
| − | === Search for interactions involving “QCR2_HUMAN”=== | + | === Search for interactions involving “QCR2_HUMAN” === |
| − | ====Using the Wizard==== | + | ==== Using the Wizard ==== |
| − | |||
| − | |||
Click the "Wizard" button - you will get a pop-up window when you do this. The following tasks should be performed for the steps defined within the wizard dialogue: | Click the "Wizard" button - you will get a pop-up window when you do this. The following tasks should be performed for the steps defined within the wizard dialogue: | ||
| Line 109: | Line 183: | ||
# Click "Perform search". | # Click "Perform search". | ||
| − | ==== Disambiguation ==== | + | The images below show each of the steps in the wizard. |
| − | # | + | |
| − | #The list of matching entries will appear in a text window below the search boxes with yellow background. The user can double click on the query to be loaded in the search box (then clicking search and load would perform the search). If the | + | <gallery perrow="5"> |
| − | #The " | + | Image:IRefIndex-Cytoscape-Wizard.png|The iRefIndex wizard |
| − | + | Image:IRefIndex-Cytoscape-Wizard-step2.png|Choosing a result type | |
| − | + | Image:IRefIndex-Cytoscape-Wizard-step3.png|Choosing a taxonomy type | |
| + | Image:IRefIndex-Cytoscape-Wizard-step4.png|Specifying the search term | ||
| + | Image:IRefIndex-Cytoscape-Wizard-step5.png|Additional options | ||
| + | </gallery> | ||
| + | |||
| + | ==== Disambiguation ==== | ||
| + | |||
| + | # The "Disambiguate before loading" option provides the user with a list matching results for the query if the search term matches to more than one entry in the selected index. If the query matches only one thing, the result will be loaded and the user will not get a chance to select from a list even though disambiguation was requested. | ||
| + | # The list of matching entries will appear in a text window below the search boxes with yellow background. The user can double click on the query to be loaded in the search box (then clicking search and load would perform the search). If the <tt>Ctrl</tt> key is held down wile clinking (single click) the entry will be deleted from the list after loading to the search box. | ||
| + | # The "Disambiguate before loading" check box is available from the last screen before performing a search from the wizard and as "Disambiguate" below the search and load button in the iRefIndex panel. | ||
| + | |||
| + | Some tips: | ||
| + | |||
| + | # Make sure "Continue after first match" is selected, "Exact matches only" is not selected in the advanced menu for better results. | ||
| + | # When you know the origin of the accession (such as UniProt, RefSeq) please use the relevant type, without selecting "Protein accession" as type. For isoform accessions and accessions with version you may not get all the available results when the search type is set to "Protein accession". | ||
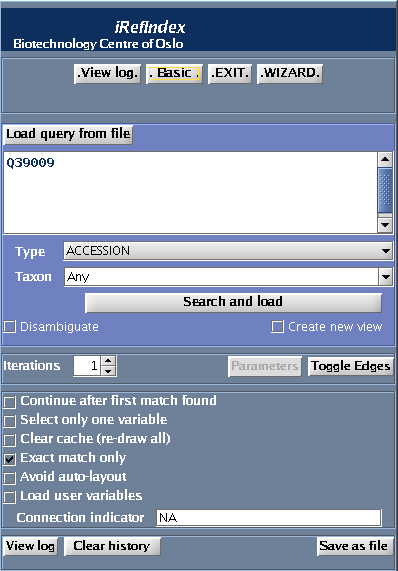
| − | + | [[Image:IRefIndex-Cytoscape-Advanced.png|thumb|300px|The iRefIndex plugin panel in advanced mode]] | |
| − | |||
| − | |||
| − | |||
| − | |||
| − | |||
| − | |||
| − | |||
| − | |||
| − | ====Using Advanced | + | ==== Using Advanced Mode ==== |
# Type the query in the search box (“QCR2_HUMAN”) | # Type the query in the search box (“QCR2_HUMAN”) | ||
| Line 134: | Line 214: | ||
# Please refer to optional parameter settings under Using the Wizard. | # Please refer to optional parameter settings under Using the Wizard. | ||
| − | ==== | + | ==== Optional Controls ==== |
| + | |||
| + | * Selecting “Continue after first match” will search the entire index, this takes more time. If “Exact match only” is selected there is no point in selecting this option. If this is not selected only the first found result will be shown | ||
| + | * Selecting the “Exact match only” check box will restrict your search only to exact matches (find results exactly matching your query). Thus, if this is checked you will not get any results if no exact match is found for “QCR2_HUMAN”. | ||
| + | * Selecting “Clear cache before searching” will clear current search results. The iRefIndex plugin caches search results to avoid redundant loading. You must clear the cache if you want to find a result as part of a new search that was already returned by a previous search. | ||
| + | # You could specify “Distance from seed list” . | ||
| + | #* Distance = 0: interactions between proteins in a list of proteins that you specify (this is only meaningful if you search for more than one protein in a search). | ||
| + | #* Distance = 1: returns proteins that interact directly with a query protein(s) that you specify. This is the default choice. | ||
| + | #* Distance = 2: returns proteins that interact directly with your query protein(s) plus their direct interactors. | ||
| − | + | ====Interpreting the Results==== | |
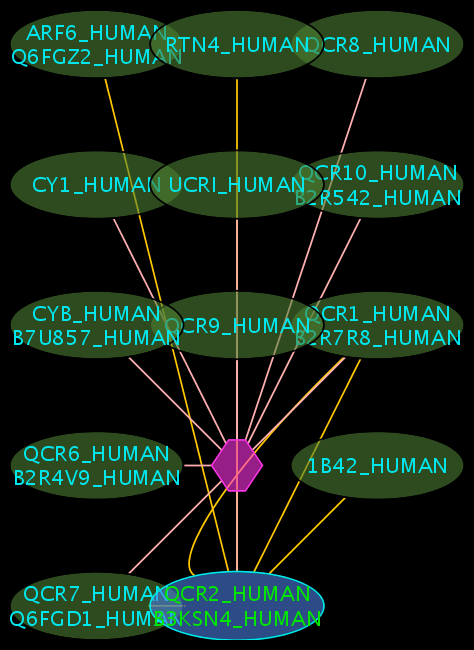
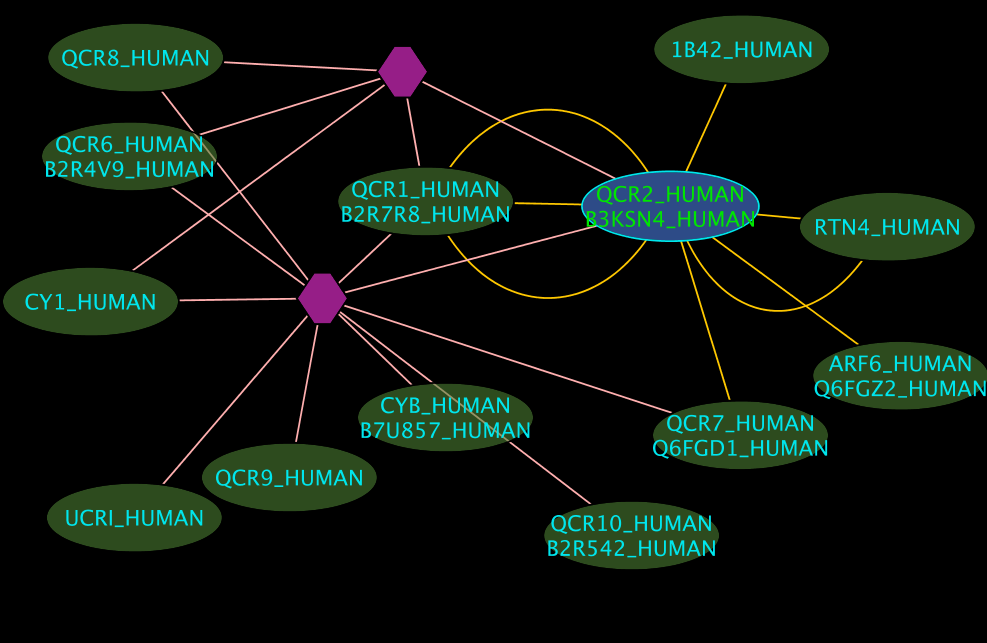
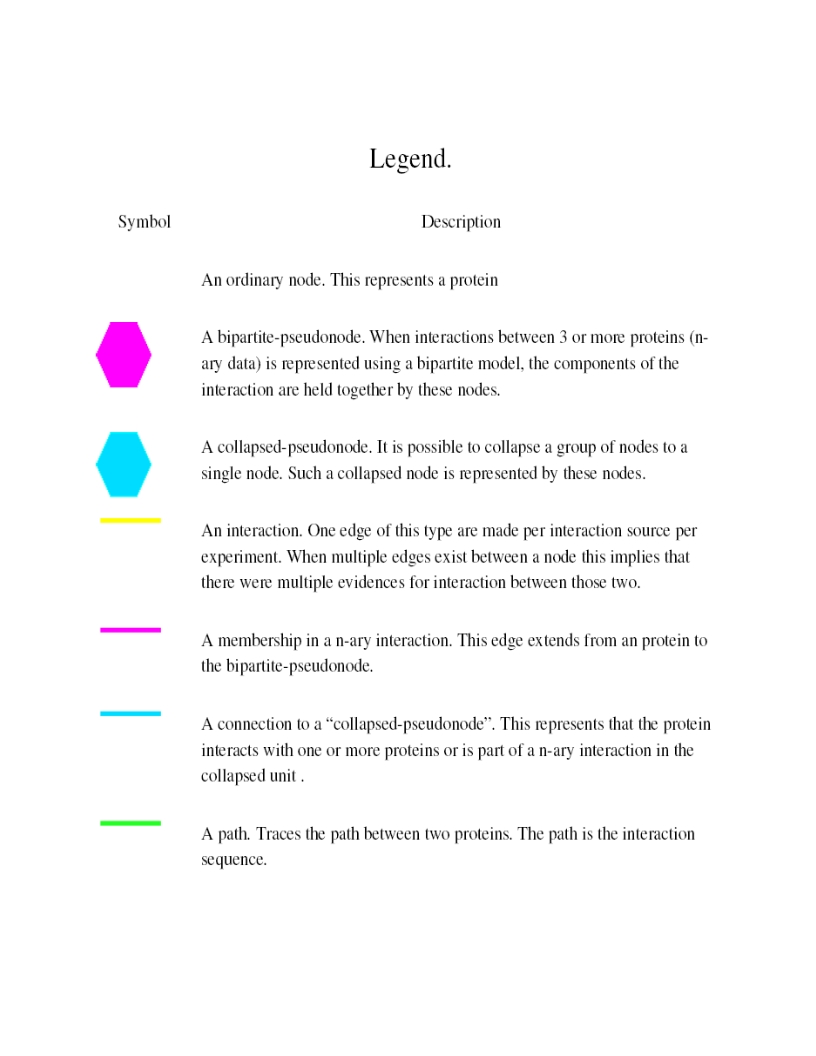
# The blue node corresponds to the protein found by your query. | # The blue node corresponds to the protein found by your query. | ||
| Line 143: | Line 231: | ||
# Orange-yellow edges indicate protein-protein interactions and pink edges represent membership of some protein in a complex. | # Orange-yellow edges indicate protein-protein interactions and pink edges represent membership of some protein in a complex. | ||
| + | Some example result displays are shown below. | ||
| + | |||
| + | <gallery widths="500px" heights="300px"> | ||
| + | Image:QCR2_HUMAN_initial.png|Results | ||
| + | Image:QCR2_HUMAN.png|Results (tidied) | ||
| + | </gallery> | ||
=== Search for interactions for a list of protein accessions=== | === Search for interactions for a list of protein accessions=== | ||
| Line 148: | Line 242: | ||
# Using the Wizard | # Using the Wizard | ||
# Using Advanced mode | # Using Advanced mode | ||
| + | |||
| + | <br clear="all" /> | ||
==Legend== | ==Legend== | ||
Latest revision as of 16:28, 6 July 2011
Date : December 03rd, 2009

The iRefIndex plugin for Cytoscape has not been officially released.
If you are looking at this page, you have probably been directed here from the
Cytoscape plugin directory at ftp://ftp.no.embnet.org/irefindex/Cytoscape/plugin .
This plugin is for testing purposes only.
Join the Google groups e-mail list at http://groups.google.com/group/irefindex?hl=en
to be informed of the official release and updates.
Contents
- 1 Installation
- 2 Notes on platform-specific issues
- 3 Bugs
- 4 Usage
- 5 Legend
- 6 Attributes
- 7 Extra features
- 8 How to load batch query from file
- 9 Integrate user data to the plugin
- 10 Attaching the plugin to a existing network
- 11 Collapsing and expanding nodes
- 12 Updating
- 13 Log files, search details and errors
- 14 Using the plugin as a search tool
- 15 Search history
- 16 iRefIndex cache
- 17 Exit plugin and force terminate operations
- 18 Basic Operation details
Installation
Before you begin
- These instructions assume that you have downloaded and installed the Cytoscape application. See http://cytoscape.org for a manual and a set of tutorials which describe the installation and use of Cytoscape.
- Make sure Cytoscape has at least 128MB memory. See the following document for more information on setting up memory: http://cytoscape.org/cgi-bin/moin.cgi/How_to_increase_memory_for_Cytoscape
- Make sure you have an active Internet connection. During installation the plugin will download files from the iRefIndex FTP site.
- Make sure you have latest JAVA environment installed (minimum requirement Java 1.5)
- Check whether the plugin is already installed (A menu entry iRefIndex_xx under plugin menu of Cytoscape). If you want to reinstall, please uninstall previous versions. if the intention is to get the latest version use "Update plugins" from plugin menu
Using Cytoscape plugin manager
- Start Cytoscape. You must start Cytoscape as a user that has write privileges to the target directory.
- From the menu select "Plugins" -> "Manage Plugins".
To uninstall the plugin:
- Select "Currently Installed" -> "Network and Attribute I/O Plugins" and choose the iRefIndex plugin.
- Then, click the "Delete" button and confirm.
- Click "Close" to leave the "Manage Plugins" dialogue and restart Cytoscape.
To make the plugin available:
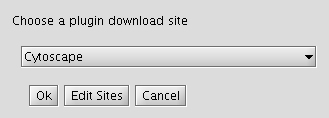
- Click on "Change Download Site" button (in the top-right-hand corner of the window).
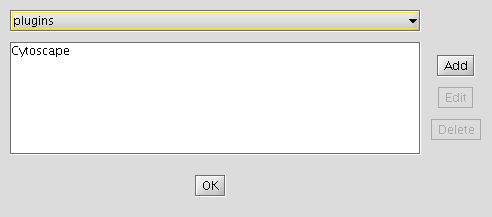
- Click "Edit Sites".
- Click "Add" and for each of the following fields, enter the suggested values:
- Name: iRefIndex
- URL: ftp://ftp.no.embnet.org/irefindex/Cytoscape/plugin/current/plugins_irefindex.xml
- Click "OK" to close each of the dialogues until the "Manage Plugins" dialogue is visible.
To install the plugin:
- Locate "Available for Install" then "Network and Attribute I/O", verifying that iRefIndex is listed in this category.
- Select the iRefIndex plugin and then click "Install" (in the bottom-right-hand corner of the window).
- Click "Close" to leave the "Manage Plugins" dialogue.
- Go to the "Completing the installation" step below.
Manual installation
- Before starting:
- Make sure that Cytoscape is not running.
- Remove any other installations of iRefIndex beta or directories created by iRefIndex.(e.g. \.....\Cytoscape_v2.6.0\plugins\iRefIndex\ )
- Copy the iRefIndex_0.6x.jar file to the plugins directory of Cytoscape. For example:
- On Unix: /.../Cytoscape_v2.6.2/plugins/
- On Windows: \...\Cytoscape_v2.6.2\plugins\
- (You should have write privileges for this directory, during installation and also during operation.)
- You may now start Cytoscape.
Completing the installation
- We recommend that you restart Cytoscape after installing the plugin or updating it.
- First time you activate the plugin (In the main Cytoscape window, select "Plugins" -> "iRefIndex_0.6x"), you will be prompted to select an installation directory for the data and indices. The recommended place would be the plugin home directory which would appear as the recommended (default). The data and indices require a minimum disk space of 1 Gb at this location. We encourage the users to use this default directory.
- If the default directory is selected and it is not accessible the user would be prompted to restart Cytoscape. If this message appears on second or subsequent attempts, this would mean there might be a problem accessing this directory and please make sure that you have write access and a minimum available free space of 1Gb.
- The downloading and installation of indices usually takes less than 5 minutes if you have a internet connection of 10Mb/sec or more. However we have experienced delays up to 15 to 30 minutes when the installation was done using wireless network with below average signal strength. If you are planing to use the plugin in a laboratory demonstration where more than 15 people would try to perform the installation simultaneously, we recommend that everyone is not using the same wireless resource and do this in subgroups (e.g. 5 at a time). If we are informed of demonstrations we could give you advice on how to perform the installation smoothly.
- The installation process should now complete itself.
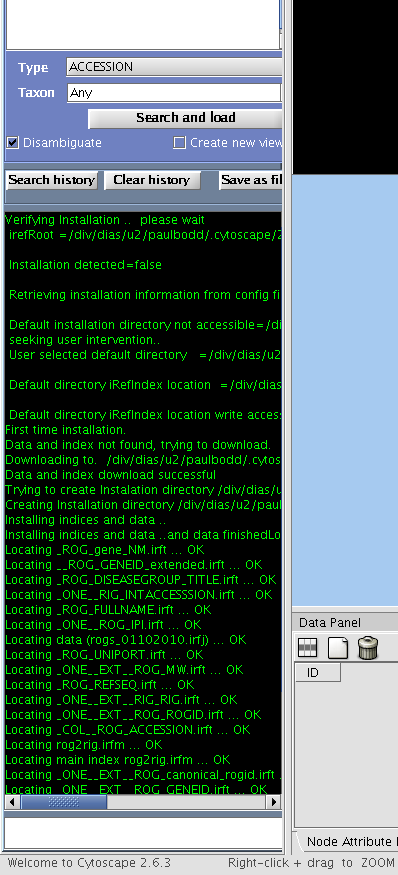
- If the installation was successful, you will see a list of indices in the Results text box in green text and if the installation fails you will see errors in red text. (If you cannot see the iRefIndex panel, click on the title "iRefIndex", near the "Network" tab of Cytoscape.)
Details of iRefindex plugin installation
- The plugin has two componants.
- The java executable file (JAR) which is the software component dealing with all the functionalities.
- Data component containing protein-protein interaction data.
both these components are required for the functioning of the plugin. The installation section above explains how to install the JAR and once the JAR is installed and the plugin is loaded the data component will be downloaded by it. The downloaded file is a compressed one and has the extension .irfz and a size around 200 MB. After the download is complete this file will be partially uncompressed (The indices and few other files required for the immediate operation will be extracted from the complex file). However, the bulk of the data will remain compressed and will be uncompressed when needed. Thus, the speed of query execution will increase with usage and the size of the iRefIndex folder will increase. Therefore, although available free space of 250Mb is enough during installation, the plugin requires available free space of 1Gb for its operation.
If the plugin manager is used for the instalation,(as of Cytoscape 2.6.3) the plugin will be placed in a directory under the home area and a record is file kept in a file named 'track_plugins.xml'. The location of these would as follows.
- Linux : ~/.cytoscape/2.6
- Windows:
The entry corresponding to iRefIndex plugin would looks like follows:
<plugin>
     <uniqueID />
     <name>iRefIndex</name>
     <description>.<br>http://irefindex.uio.no/wiki/README_Cytoscape_plugin_0.6x<p></description>
     <cytoscapeVersion>2.6</cytoscapeVersion>
     <url />
     <downloadUrl />
     <category>Network and Attribute I/O</category>
     <releaseDate>JANUARY 15, 2009</releaseDate>
     <pluginVersion>0.63</pluginVersion>
     <classname>cytoscape.no.uio.biotek.Main</classname>
     <projectUrl>http://irefindex.uio.no</projectUrl>
     <filetype>jar</filetype>
     <installLocation>/............/Cytoscape_2_6_3/plugins/iRefIndex_beta6.jar</installLocation>
     <license>
       <text />
     </license>
     <authorlist>
       <author>
         <name>Ian Donaldson and Sabry Razick</name>
         <institution>Biotechnology Centre of Oslo, University of Oslo</institution>
       </author>
     </authorlist>
     <filelist>
       <file>/........../Cytoscape_2_6_3/plugins/iRefIndex_beta6.jar</file>
     </filelist>
   </plugin>
- TIP!. If you do encounter an exception during start up of Cytoscape due to a plugin and there is no way of uninstalling it, you could remove the entry for the corresponding plugin from this file when Cytoscape is not running (Take a backup of the file, then delete everything from <plugin> to </plugin> for the troubling plugin, save the file and then start Cytoscape)
The downloading and installation of the plugin JAR is manged by Cytoscape core and if the plugin complies with the requirements the instalation should be smooth. However, some of our users do encounter problems when instating the data component. This is mainly due to privileged and security issues.
- Privileged issue is whether the user has access to the place where he intends to download the data component (The directory should have write access)
- Security issues are mainly encountered in Microsoft Windows based systems. When a software try to perform a suspicious operation the operation is blocked and the user is prompted confirm that this is something he knows. The the user select block in such a warning window during the installation of iRefIndex plugin, the installation fails may not be possible to install again until the block is removed manually. We have tested with several popular virus guards but have not encountered any issues relating to them yet, if you encounter any issue please report to us.
The behavior of the plugin when installed using plugin manager is different before and ofter Cytoscape is restarted. After the installation the plugin will appear in the plugin manager and could be activated, however it is not aware of its surrounding. i.e it doesn't know its installation location. Therefore it is highly recommended that the user restart Cytoscape immediately after installing the plugin and avoid activating the plugin before the first restart (do not click on the menu entry iRefIndex). When a manual installation was performed the plugin could be activated for the first start up of Cytoscape as Cytoscape is not running while the installation. After the first restart of Cytoscape after installing the plugin when the plugin is activated it tries to download the data component. For this the plugin requests a location to place the data and it suggests a default location under the home area (or plugin folder for manual installation), we recommend using this default location unless there is a absolute requirement to do otherwise.
some of the reasons behind distributing the data with the plugin rather than more popular approach like web services is as follows;
- Execution speed
- No need for a fast internet connection after installation
- Our server-side limits
- Privacy for the user (There is no monitoring of the types of searches the end user performs, this remains private unless the user decides to share it)
Notes on platform-specific issues
Windows Vista and Windows XP
You will require write privileges to the installation directory not only during installation but also during operation. If the plugin disappears from the plugin menu or it does not appear at all, then Cytoscape has to be started as an administrator. This could be done by right-clicking on Cytoscape shortcut and selecting "Run as" option. When requesting help for such situations please include a copy-paste of the Cytoscape error console ("Help" -> "Error console"). (To copy-paste, open the error console, click inside, press Ctrl-A (to select all) then Ctrl-C (to copy). The selection can then be pasted into a message using Ctrl-V.)
Mac OS X
- Please verify that Java 1.5 or later is available. The plugin will not work unless Java 1.5 or later is installed.
- Increase the Xmx setting to 512m and the Xms setting to 512m in cytoscape.sh.
- This version of the plugin is not extensively tested on Mac OS and we are sorry that the support we could provide for Mac users is limited at this point.
Unix/Linux
- Please verify that Java 1.5 or later is available.
- The "Java SE Development Kit (JDK)" from http://java.sun.com/javase/downloads/index.jsp is suitable.
- The OpenJDK packages from http://openjdk.java.net/install/ may also be suitable and are often available via distributions. For example, OpenJDK 6 for Debian and Ubuntu.
- You will require write privileges to the installation directory not only during installation but also during operation.
- The plugin behavior is proven to be very stable in Unix/Linux environments.
- To improve font appearance, try adding the following environment variable definition to your configuration (in .bashrc or .bash_profile), as described in this guide to Java fonts for Arch Linux:
export _JAVA_OPTIONS='-Dawt.useSystemAAFontSettings=lcd'
Other
If you try to install the plugin on different platforms please share your experience with us through the Google group (http://groups.google.com/group/irefindex?hl=en)
Bugs
- When updating data on Microsoft Windows XP and Vista. "Failed to find resources message" may appear in the log message window. If this happens please run the update again and the plugin will check and correct the problem during the second attempt.
Please report us if you encounter any new bug
Usage
Search for interactions involving “QCR2_HUMAN”
Using the Wizard
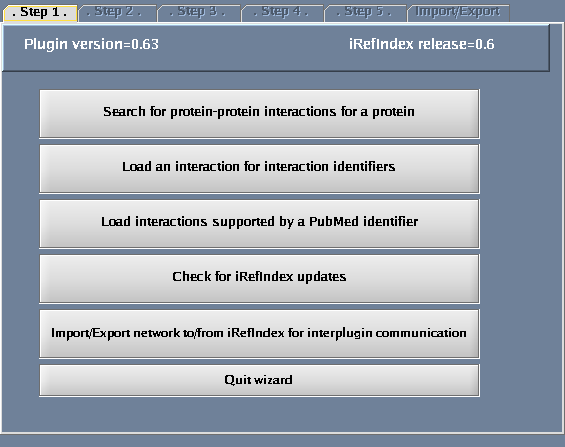
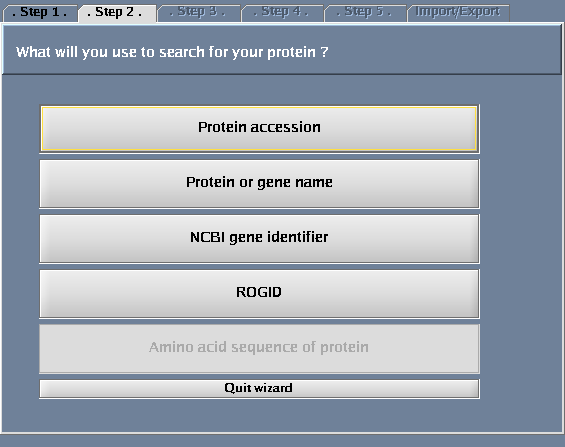
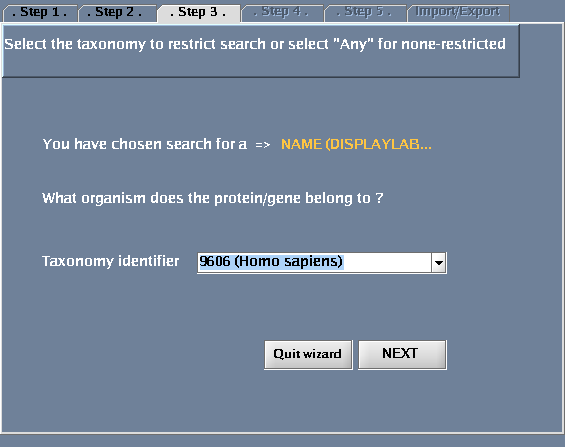
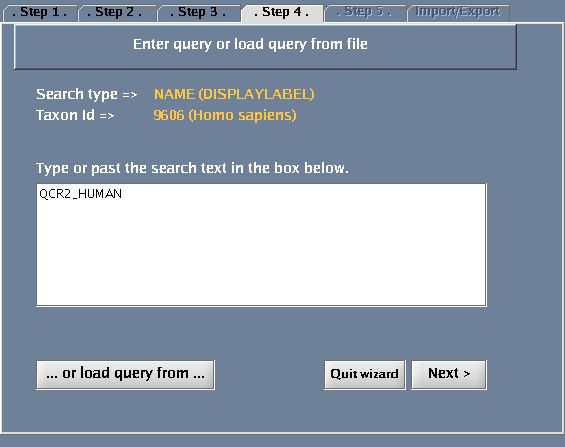
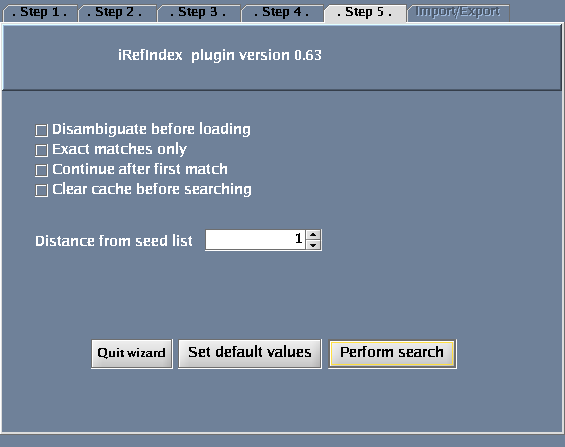
Click the "Wizard" button - you will get a pop-up window when you do this. The following tasks should be performed for the steps defined within the wizard dialogue:
- Select "Search protein-protein interactions for a protein".
- Select "Protein or gene name".
- For "Taxonomy identifier", select "9606 (Human)" to restrict the search to human proteins and click "Next". (Select "Any" to get results for all species.) You could also type in an NCBI taxonomy identifier into this box (http://www.ncbi.nlm.nih.gov/Taxonomy/Browser/wwwtax.cgi).
- Type QCR2_HUMAN in the provided space. Click "Next".
- Click "Perform search".
The images below show each of the steps in the wizard.
Disambiguation
- The "Disambiguate before loading" option provides the user with a list matching results for the query if the search term matches to more than one entry in the selected index. If the query matches only one thing, the result will be loaded and the user will not get a chance to select from a list even though disambiguation was requested.
- The list of matching entries will appear in a text window below the search boxes with yellow background. The user can double click on the query to be loaded in the search box (then clicking search and load would perform the search). If the Ctrl key is held down wile clinking (single click) the entry will be deleted from the list after loading to the search box.
- The "Disambiguate before loading" check box is available from the last screen before performing a search from the wizard and as "Disambiguate" below the search and load button in the iRefIndex panel.
Some tips:
- Make sure "Continue after first match" is selected, "Exact matches only" is not selected in the advanced menu for better results.
- When you know the origin of the accession (such as UniProt, RefSeq) please use the relevant type, without selecting "Protein accession" as type. For isoform accessions and accessions with version you may not get all the available results when the search type is set to "Protein accession".
Using Advanced Mode
- Type the query in the search box (“QCR2_HUMAN”)
- Select “Name” as type from the "type" drop down menu
- Select 9606 (Human) as the taxon identifier to restrict the search to human
- Click Search and Load.
- Please refer to optional parameter settings under Using the Wizard.
Optional Controls
- Selecting “Continue after first match” will search the entire index, this takes more time. If “Exact match only” is selected there is no point in selecting this option. If this is not selected only the first found result will be shown
- Selecting the “Exact match only” check box will restrict your search only to exact matches (find results exactly matching your query). Thus, if this is checked you will not get any results if no exact match is found for “QCR2_HUMAN”.
- Selecting “Clear cache before searching” will clear current search results. The iRefIndex plugin caches search results to avoid redundant loading. You must clear the cache if you want to find a result as part of a new search that was already returned by a previous search.
- You could specify “Distance from seed list” .
- Distance = 0: interactions between proteins in a list of proteins that you specify (this is only meaningful if you search for more than one protein in a search).
- Distance = 1: returns proteins that interact directly with a query protein(s) that you specify. This is the default choice.
- Distance = 2: returns proteins that interact directly with your query protein(s) plus their direct interactors.
Interpreting the Results
- The blue node corresponds to the protein found by your query.
- Green nodes are interacting partners for your query protein.
- Purple hexagons are complex-nodes (also called pseudo-nodes). They keep partners of a complex together (i.e. QCR6_HUMAN is found in two complexes also involving “QCR2_HUMAN”).
- Orange-yellow edges indicate protein-protein interactions and pink edges represent membership of some protein in a complex.
Some example result displays are shown below.
Search for interactions for a list of protein accessions
- Creating a batch file
- Using the Wizard
- Using Advanced mode
Legend
Attributes
There are two types of attributes available from iRefIndex. Some of this are directly s useful for to the user as the 'i.name' which provides the name of the protein. Some others, are intended to be used for filters i.e. 'i.order'. Brief description of each one of these are given below.
- To display attributes the user have to select the ones to be displayed.
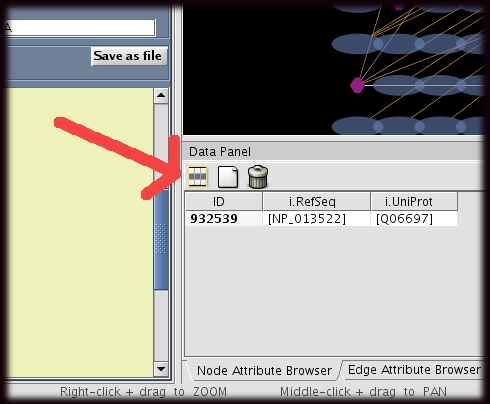
- This could be done by clicking ion the select attribute button and ticking the attributes to be displayed. (This button is located in the data panel). Please see the image on the right, the red arrow points to "Select attribute"
Edge Attributes
| Attribute name | Data type | Example value | Description |
| ID | String | 763208 (1706078(EBI-307734)) 2287025 | This is a unique identifier for the edge assigned by Cytoscape (no two edges would have same ID). |
| I.PMID | Integer | 15014444 | Publication identifier of the publication where the interaction represented by the edge mentioned (http://www.ncbi.nlm.nih.gov/sites/entrez?db=pubmed) |
| i.bait | Integer | 763208 | Bait of this interaction where relevant |
| i.detection | String | 2 hybrid | Interaction detection method |
| i.detection_ref | String | psi-mi:MI:0018 | The PSI-MI identifier for the interaction detection method (http://www.psidev.info/index.php?q=node/277) |
| i.experiment | String | siaud-2004-1 | The experiment where this interaction was found (usually contains authors names) |
| i.np | Integer | 2 | PubMed Identifiers (PMIDs) point to literature references that support an interaction (http://irefindex.uio.no/wiki/README_iRefIndex_MITAB_4.0) |
| i.lpr | Integer | 11 | The lpr score (lowest pmid re-use) is the lowest number of distinct interactions that any one PMID (supporting the interaction in this row) is used to support.(http://irefindex.uio.no/wiki/README_iRefIndex_MITAB_4.0) |
| i.hpr | Integer | 15 | The hpr score (highest pmid re-use) is the highest number of interactions that any one PMID (supporting the interaction in this row) is used to support.(http://irefindex.uio.no/wiki/README_iRefIndex_MITAB_4.0) |
| i.int_id | String | EBI-307734 | The identifier used by the original interaction source for the interaction represented by this specific edge |
| i.part_ident | String | immunostaining | The method used to identify the components of this interaction |
| i.part_id | String | psi-mi:MI:0422 | The PSI-MI identifier for the method used to identify the components of this interaction (http://www.psidev.info/index.php?q=node/277) |
| i.rigid | String | TAabV6yJ1XzUvEhYwZLpu5reBU0 | Redundant interaction group identifier for the interaction (http://irefindex.uio.no/wiki/README_iRefIndex_MITAB_4.0) |
| i.source | String | IntAct | Original interaction source database reported the interaction represented by the edge |
| i.query | String | Q39009 | The query returned this interaction |
| i.flag | Integer | 1 | Indicates the edge type (0- the representative edge, used in edge toggle, 1- a edge which will disappear during edge toggle, 2- complex holder edge,6-a path, 7-Edge from or to a collapsed node, ) |
| i.isLoop | Integer | 1 | Indicate whether the interaction is a self interaction (i.e dimer) |
Node Attributes
| Attribute name | Data type | Example value | Description | ||
| ID | Integer | 377895 | This is a unique identifier for the node assigned by Cytoscape (no two nodes would have same ID). | ||
| i.RefSeq | Array | [NP_195783] | All RefSeq identifier for the protein represented by the node (http://www.ncbi.nlm.nih.gov/) | ||
| i.RefSeq_TOP | String | NP_195783 | One randomly selected RefSeq identifier for the protein represented by the node (http://www.ncbi.nlm.nih.gov/) | ||
| i.UniProt | Array | [Q9XIR8, Q2PDG5] | All UniProt identifier for the protein represented by the node (http://www.uniprot.org/ttp://www.ncbi.nlm.nih.gov/) | ||
| i.UniProt_TOP | String | Q9M6R5 | One randomly selected UniProt identifier for the protein represented by the node (http://www.uniprot.org/ttp://www.ncbi.nlm.nih.gov/) | ||
| i.UniProt_nm | Array | [SEM11_ARATH, Q2PDG5_ARATH] | All UniProt name for the protein represented by the node (http://www.uniprot.org/ttp://www.ncbi.nlm.nih.gov/) | ||
| i.UniProt_nm_TOP | String | Q9M6R5_ARATH | One randomly selected UniProt name for the protein represented by the node (http://www.uniprot.org/ttp://www.ncbi.nlm.nih.gov/) | ||
| i.fullname | Array | [Q8GYD2_ARATH, AT4G29170] | All the names in there full form as given by the original interaction sources | ||
| i.fullname_TOP | String | Q8GYD2_ARATH | One randomly selected name in its full form as given by the original interaction sources | ||
| i.name | Array | [Q8GYD2_ARATH, AT4G29170] | All the names in there short form as given by the original interaction sources | ||
| i.name_TOP | String | Q8GYD2_ARATH | One randomly selected name in its short form as given by the original interaction sources | ||
| i.geneid | Array | [828230] | All NCBI gene identifier for the protein represented by the node (http://www.ncbi.nlm.nih.gov/) | ||
| i.geneid_TOP | Integer | 828230 | One randomly selected NCBI gene identifier for the protein represented by the node (http://www.ncbi.nlm.nih.gov/) | ||
| i.xref | Array | [AAF70826.1,Q9M6R5] | All the accession as given by the original interaction sources | ||
| i.xref_TOP | String | AAF70826.1 | One randomly selected accession as given by the original interaction sources | ||
| i.sequence | String | MVMAQKLKEAE... | The primary amino acid sequence of the protein represented by the node | ||
| i.rogid | String | 2mL9oLZ9g/SSPyK0nOz97RmOzPg3702 | The base 64 representation of SHA-1 for the primary amino acid sequence of the protein represented by the node concatenated with its taxonomy identifier at the end (http://irefindex.uio.no/wiki/README_iRefIndex_MITAB_4.0) | ||
| i.query | String | Q39009 | The query used to retrieve the interactions, this value is set only for the base node (one in blue) | ||
| i.MW | Integer | 126652 | The molecular weight of the protein represented by the node | ||
| i.popularity | Integer | 10 | How many other new nodes requested a edge partneership whith this node. | ||
| i.order | Integer | 1 | The distance from the query node (query node=0 , direct neighbors=1 ). Pseudonodes have negative values (-1= complex holder, -2=collapsed instance ) | ||
Extra features
To be described
- Edge Toggle
- Load user variables
How to load batch query from file
1. Create a text file with the following format:
<type><NCBI_taxonomy_identifier>
query_text_1
query_text_2
query_text_3
The first line of the file starts with a hash ("#") and then the type. The type could be
- ACCESSION
- NAME
- GENID
The query_text is your query (e.g.Q39009). Each query line has to be terminated by a new line character (press enter after each line)
[Sample batch file: [1]]
Integrate user data to the plugin
How to create your own file to use as index
How to create node and edge attributes
Example: Attaching disease group identifiers to Nodes (http://irefindex.uio.no/wiki/DiG:_Disease_groups)
Attaching the plugin to a existing network
Collapsing and expanding nodes
- To collapse a set of nodes:
- selected a node
- Hold down the control key (Ctrl) and double click on the selected node. Alternatively you could right click on the selected node and select "Collapse" from the local menu.
- The selected node and all the connecting nodes to it will be replaced by a single hexagonal blue node. The edges which were connected to any of those collapsed node would now connect to this new node
- To expand
- Double click om collapsed node to expand. Alternatively you could right click on the selected node and select "Expand" from the local menu.
The collapsing algorithm functions serially. If you keep on collapsing nodes one after another as a single collapsed node. The expansion happens in the revers order. The last node set collapsed will expand first.
However, if a shortest path request is made between nodes connected across a collapsed node, the nodes required to complete the path would be selectively expanded. This operation will not effect the normal expansion process, if you later decide to expand all the collapsed nodes.
Warning! Collapsed nodes can be expanded only during the current session. If you collapse a set of nodes and save the file and retrieve it later, the collapsed node may not expand as expected. We will try to solve this issue in the future releases.
Updating
- From Cytoscape updater
- Using plugins update feature
Log files, search details and errors
- How to interpret log messages and save them for later reference.
Using the plugin as a search tool
The plugin could also be used to search the current network. However, there is a better search option in Cytoscape with Google suggest which may be more convenient to use. The reason for including the search function was that the Cytoscape search filed remained inactive on some occasions for networks crated using the plugin. The reason for this is still unknown and deleting a node on the network seems to activate it, when this bug will be fixed the users are encouraged to use the Cytoscape search option. Currently, if a user performs a search with a term and if the corresponding protein is already loaded, the loaded protein (corresponding node) would be highlighted with Cytoscape default highlight colors.
Search history
- The History box
iRefIndex cache
- Clear cache (re-draw all) option
iRefIndex plugin uses cached information to prevent reloading information. Therefore, This option allows the user to override this function and re-load everything even though it may have been already loaded. every time user create a new cytoscape view this option is automatically selected.
clear cache has to used with caution when using iteration=0 (load only interactions between the query proteins). If clear cache is selected when constructing a network while iteration set to 0, the connections would not be recognized and this should be avoided. If a new view created and the user plans to load iteration=0 network, then the clear cache must be selected.
Exit plugin and force terminate operations
The exit button performs two functions.
- First one is to exit iRefIndex plugin, where the outcome is to detach the plugin from Cytoscape.
- The second function "FORCE STOP" (only available during a active task) is to terminate current operation. The "FORCE STOP" is useful when the search query or a subsequent operation takes too long to finish or none-responding. When a force stop is performed the out come is unpredictable and behavior was undefined, therefore results after such operation could not be trusted.
Basic Operation details
During installation the plugin downloads protein-protein interaction data from iRefIndex (ftp://ftp.no.embnet.org/irefindex/Cytoscape/plugin/current/) in a compressed form. The downloaded files will be in the directory iRefIndex under the Cytoscape plugin folder. We recommend not to change any files in this folder as this may lead to unpredictable results. Especially, please do not open them in word processor software (e.g. Microsoft office). After successful installation you will also find some index files and serialized Java objects files which will be used in search and load operations.
- Brief description of the files
- irft files: this file contains a ROG(Redundant Object Group) to PARAMETER mapping. This is a sort of index that maps identifiers like accessions and names to ROGs. The ROG is an integer representation of the ROGID. However, ROG is not stable like ROGID and it may be different from one version to another. However, from beta4 onwards the ROGID to ROG mapping will be propagated for backwards compatibility for live proteins (proteins which are not removed from original source).
- Irfm files: These are index files containing information about partners of each interaction.
- ROGS Directory: Contains protein attributes (Warning! Please do not try to open this directory in a file browser; the computer may crash)
- RIGS Directory: Contains interaction attributes (Warning! Please do not try to open this directory in a file browser; the computer may crash)
- Irfj files : these files contain the interaction and object data in a compressed form. When requested for the first time the information will be uncompressed to the RIGS or ROGS directory.

